What the scanner does to your photo
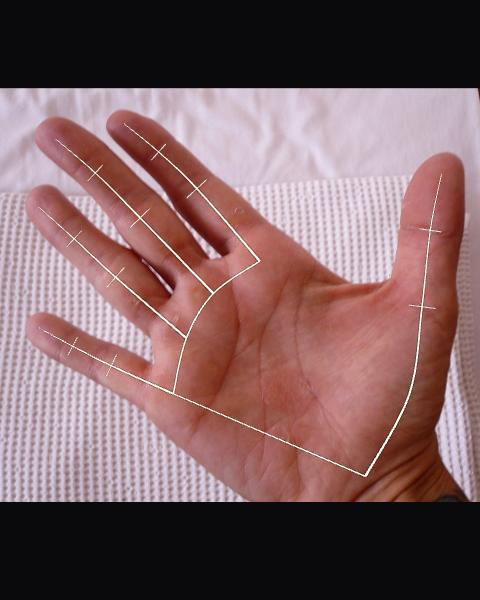
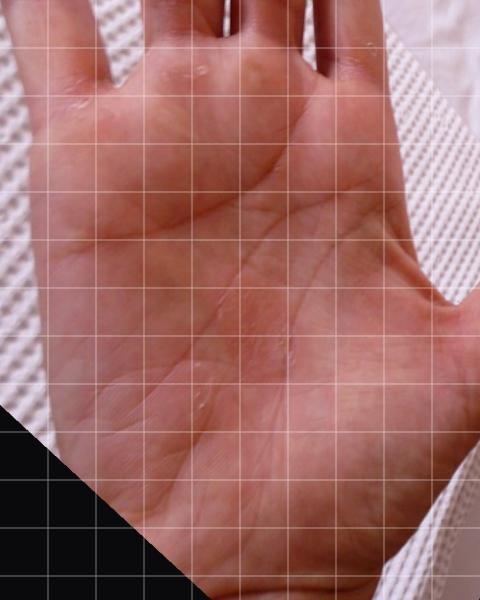
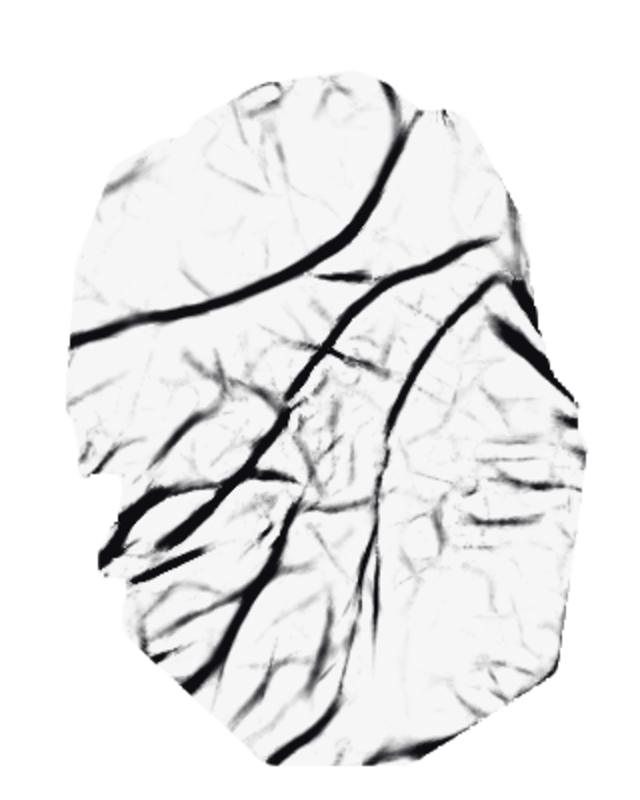
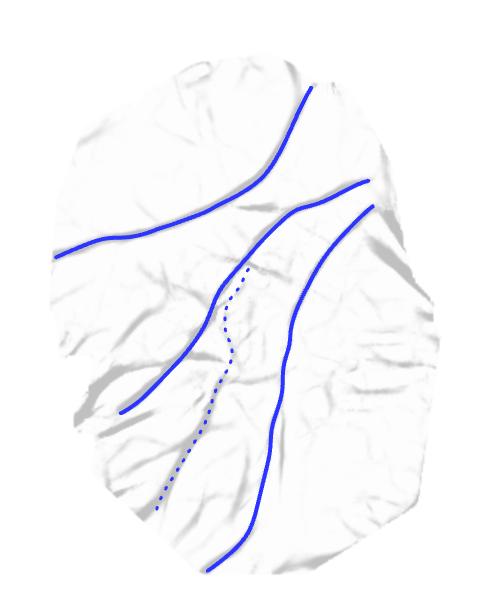
Nothing in this sequence is drawn by an illustrator. Each picture is what the code produced, and your own result shows the same four pictures of your hand under the heading "How it was traced".
Finding the hand
The first job goes to MediaPipe Hand Landmarker, a model from Google that places "21 hand-knuckle coordinates" on a hand in a still image or a live video. It runs inside your browser, from files this site serves. It also says whether it is looking at a left or a right hand, so you never have to.
On a live camera it reads frame after frame and tells you what to change, one instruction at a time: "Bring your hand closer", "Spread your fingers", "Hold your palm flat to the camera". When your hand holds still, it takes the picture. A photo gets several tries at different sizes and turns, because the model often misses a hand in a large picture and finds it once the picture is cleanly scaled down.
Flattening the palm
Nobody holds a hand perfectly square to a lens. So the wrist, the base of the thumb and the four knuckles at the base of the fingers fix a warp that turns your palm into the same upright rectangle every time. A left hand gets mirrored for this, so one map of the palm serves both hands, and it is mirrored back before you see it. Lengths are still measured against your palm's width in the original photo, so the warp doesn't bend the numbers.
Building the crease map
A crease is a thin dark valley in the skin, and that shape is what the filter looks for. Red hides creases, so it works from a mix that is mostly blue with some green. It evens out the light inside the palm, so a bright side and a dim side count the same. It tests for valleys at four widths, then gives extra credit to marks that carry on in one direction, which is how a long crease beats a patch of speckle. Palm-line detection is an old problem in biometrics, where researchers separate the principal lines from wrinkles "much thinner than principal lines and much more irregular". Fig. 1 shows the same difference.
Following each line
Each line has a band where palmistry says it starts and a band where it ends. The scanner finds the cheapest route between them across the map, the way a route planner would, where following a dark crease is cheap and cutting across clean skin is expensive. It solves the heart line first, then life, head and fate, with rules that keep them apart: the other three stay below the heart line, and only the head line may share the life line's first stretch.
Then it checks the ends. A sharp corner near the end of a path means the search left its crease to reach the zone, so that part is cut, and the line is followed along its own heading until the crease fades. The end you see is where the line stopped, measured, and not a point the search was aimed at.
A path search always finds a path
That is the catch in this method. Ask for the cheapest route across any palm and you will get one, even on a hand with no such crease. So a line on the screen proves nothing by itself.
The test comes next. The scanner runs the same search 18 more times on your palm, between random points, and compares each line with those random paths. A real crease should hold far more evidence than a path that was only looking for the nearest dark mark. Your result prints the numbers for your hand. Here they are for the hand in Fig. 1, from a sharp still and from a compressed video clip of the same photo.
| Line | Still: label | Beaten | Strength | Video clip: label | Beaten | Strength |
|---|---|---|---|---|---|---|
| Heart line | High | 18 of 18 | 2.15x | High | 17 of 18 | 1.70x |
| Head line | High | 18 of 18 | 2.57x | High | 18 of 18 | 2.13x |
| Life line | High | 17 of 18 | 1.85x | Medium | 16 of 18 | 1.34x |
| Fate line | Low | 15 of 18 | 1.45x | Not found | 3 of 18 | 0.73x |
The label then decides how firmly anything is said about that line, in the trace and in your reading:
- High shows on screen as "Clear". You get the line's length and where it ends, stated plainly, with handles in case you disagree.
- Medium shows as "Fairly clear". The length comes with an "about", and you are asked to check.
- Low shows as "Faint, worth a check". Nothing is claimed about its shape. You are asked to drag it to where you see it.
- Not found is never drawn or described. The line is offered for you to place yourself.
In our own test a High line was almost never wrong, and a Low line often was, which is the reason it asks rather than tells. The test was small, and we marked it ourselves. The figures and the reasons to doubt them are on the methodology page.
Getting a clean scan
- Find even light and clear anything off your palm.
- Press Start my scan, pick a question if you like, and choose your camera or a photo.
- Hold your whole open hand up, fingers apart, until the scanner takes the picture. With a photo, this happens by itself.
- Watch your lines get traced. Tap any line and drag its handles if it looks wrong.
- Press See my reading.
If the scanner can't get everything it wants, its checks relax the longer you hold your hand up, and a "Use this frame" button appears, so you are never stuck on one instruction. Phones that allow it also get a camera light and a switch between cameras on the stage.
Reads well
The whole hand, fingers in the shot and apart, palm flat, nothing on it.
Fingers cut off
Close-ups of only the palm usually aren't detected at all. The model needs the fingers to know it's looking at a hand.
Something on the palm
The commonest cause of a wrong trace in our test. A pen, paint or an object has an edge, and the trace follows it.
A hard shadow
To the filter, a sharp shadow edge looks like a crease. Soft, even light does more for you than bright light does.
Tilted
You'll see "Hold your palm flat to the camera". The flattening step helps, but past a point the ratios have to fall back on depth estimates, and those are noisier.
Too far away
You'll see "Bring your hand closer". Fine creases need pixels: on the photos we called clear, the palm was at least about 300 pixels wide.
When it gets it wrong
These are the faults we saw when we tested it, most useful first. Knowing them will tell you which of your own lines to check.
Something on your palm.
Pens, paint, objects and projected light. The hand model's own card lists objects, jewellery and henna as out of scope, and most wrong traces on poor photos in our test came from this.The bottom of the life line.
The commonest fault on clear photos. It starts right, then slides onto a parallel crease or stops early. Look there first, and drag the lowest handle.The fate line.
Many hands have several lengthwise creases, and the search picks one of them. In our test it was fully right on very few hands, so it is treated as a line for you to check or place, whatever its label says.A hand with few creases.
A hand with one crease across it can get a head line placed on a wrinkle, and a faint heart line can be missed. Both come back labelled low, or not at all.Forks and breaks.
Most breaks the search reported turned out to be the trace straying off its crease. So your reading never mentions a break, and it hints at a fork only on a clear line, in words that allow for being wrong.The smaller lines.
When we switched on the search for the sun, marriage, children and money lines, every trace it made was wrong by eye. So it stays off, and those lines are yours to place.
That list is why every line has handles. Tap a line and drag one: it snaps to the nearest crease between your handles and measures itself again, so what you read afterwards rests on where you put it. Your reading says when a line was placed by you. The arrow keys move a handle too, and "Put it back" undoes it. For more on correcting lines, the line tracer opens with the handles already showing.
Camera or photo
Start with the camera, because it guides your hand into place and you watch your creases light up as you hold still. A sharp still can still beat it. The table above shows the same hand reading more confidently from a still than from a video clip, though our clip was heavily compressed, which may explain much of that. We haven't yet measured the scanner on real phones in real hands, so treat that as a clue and not a rule. If a camera scan comes back mostly faint, take a picture with your phone's own camera in good light and upload it.
Which hand to scan
Either one, since the scanner works out which hand it is seeing. Cheiro's advice was that "both the hands should be examined together", the left for "natural tendencies", the right for what you have made of them. Other traditions choose by gender, and they don't agree with each other. Which hand to read sets them side by side.
What a scanner can't do
It measures creases. It doesn't see your future, and neither does anything else: biologically, as one 2019 paper puts it, the line of life "is merely another flexion crease", and its authors note there is no evidence behind claims that palm reading software can forecast anything. What the scan reports about your life line is the length and curve of a crease, and nothing more.
What your result says about a line comes from a fixed library of sentences written in advance, drawing on old books and labelled as tradition. No AI reads your hand in the free scan. For the studies, including the one that seemed to find something, see is palm reading real.
A scanner, a photo app or a person
These do different jobs. For the scan itself, the free palm reading scanner costs nothing and needs no account. Listed prices for apps are compared in our guide to palm reading apps, and there is advice on sitting with someone in palm reader near me.
- What looks at your hand
- This scannerA hand model, a crease filter and a path search, in your browser.
- A photo-to-text appOften a language model reading your photo on a server. The pages we read rarely say.
- A personSomeone trained in one school or another, holding your hand under a good light.
- What you can check
- This scannerThe trace, its label and its measurements. You can move any line.
- A photo-to-text appUsually only the finished text. A fluent paragraph reads the same whether it saw your lines or not.
- A personYou can ask why, and see where they're looking.
- What it misses
- This scannerSmall marks, the finer lines, and how raised a mount is.
- A photo-to-text appYou can't easily tell.
- A personLess on your hand, but a reader can read you too. In 1927 Markun noted that a wedding ring is a clue fortune tellers watch for.
- What it costs
- This scannerThe scan and one full line are free.
- A photo-to-text appAnything from free with paid extras to a weekly subscription.
- A personAbout $25 to $100 for a private 30 minutes in the US, as a rough guide from listed providers.
Whichever you pick, the lines mean what the tradition says they mean, and no more. If you'd like to learn it yourself, our palm reading guide takes you through a hand, and the map of palm reading lines shows what each one is called. A sample reading shows where the paid version goes from there. Everything else the same scan can do is on the tools page.